We’ll use Stack AI workflow builder for claims automation and create an AI agent to enable users to upload accounting documents—like invoices, receipts, and claim forms—and automatically convert them into structured JSON using OCR and GPT-based processing.
The extracted data can then be sent to a Google Sheet or used in custom apps and databases.
Workflow overview for claims processor agent :

Claims processor agent overview:
Step 1: Create a new Stack AI flow
- Log in to your Stack AI dashboard.
- Click “New Project” and name it something like claims processing agent.

Step 2: Add a file upload node
Input and output nodes are the foundation of any Stack AI application and act as the connection points exposed via the API to your users. To begin, you’ll set up a file upload node that enables users to submit claims, invoices, and other documents.
- Go to the Inputs category in the sidebar.
- Drag the Files node onto the canvas.

- Update the node’s label to “Claims, Receipts, and Invoices” to indicate the type of files users should upload.
- This node will use OCR to scan uploaded documents and extract unstructured text.
The File Node lets users upload a file into the flow to be used as input for a large language model (LLM).

Step 3: Connect to an LLM
The OpenAI node allows you to seamlessly integrate large language models (LLMs) into your workflows. You can configure the LLM that best fits your specific use case.
- Go to the LLMs section in the sidebar. From the available options, drag a model provider (OpenAI).

- Select a model (GPT-4.1) in the OpenAI node settings.

Step 4: Define the prompt and JSON schema
Use this in the Instructions field of the OpenAI node to extract data from documents:

You extract data from accounting-related documents and return a JSON.
Use the schema below:
{
  "type": "object",
  "properties": {
    "document_type": {
      "type": "string",
      "enum": ["invoice", "receipt", "claim_form"]
    },
    "invoice": {
      "type": "object",
      "properties": {
        "invoice_number": { "type": "string" },
        "date_of_issue": { "type": "string", "format": "date" },
        "vendor": {
          "type": "object",
          "properties": {
            "name": { "type": "string" },
            "contact": { "type": "string" }
          }
        },
        "customer": {
          "type": "object",
          "properties": {
            "name": { "type": "string" }
          }
        },
        "line_items": {
          "type": "array",
          "items": {
            "type": "object",
            "properties": {
              "description": { "type": "string" },
              "quantity": { "type": "number" },
              "unit_price": { "type": "number" },
              "total": { "type": "number" }
            }
          }
        },
        "subtotal": { "type": "number" },
        "tax": { "type": "number" },
        "total_amount": { "type": "number" },
        "payment_terms": { "type": "string" },
        "due_date": { "type": "string", "format": "date" }
      }
    },
    "receipt": {
      "type": "object",
      "properties": {
        "receipt_number": { "type": "string" },
        "date_time": { "type": "string", "format": "date-time" },
        "merchant": {
          "type": "object",
          "properties": {
            "name": { "type": "string" },
            "location": { "type": "string" }
          }
        },
        "items": {
          "type": "array",
          "items": {
            "type": "object",
            "properties": {
              "description": { "type": "string" },
              "quantity": { "type": "number" },
              "price": { "type": "number" }
            }
          }
        },
        "total_amount_paid": { "type": "number" },
        "payment_method": { "type": "string" },
        "tax_details": { "type": "string" }
      }
    }
  },
  "required": ["document_type"]
}- Then enter the following text into the Prompt field.

Files provided by user:

<Files>
Claims, Receipts, Invoices
</Files>

Extract all available information and return a JSON that matches the schema exactly. If fields are missing, include them as empty.

You extract data from accounting-related documents and return a JSON.

Use the schema below:

<JSON_Schema>

{
  "type": "object",
  "properties": {
    "document_type": {
      "type": "string",
      "enum": ["invoice", "receipt", "claim_form"]

    },
    "invoice": {
Step 5: Connect to Google Sheets
Once you’ve configured the LLM prompt, you can route the structured data to a spreadsheet for access and analysis.
- Go to the Apps section in the sidebar.
- Select Write to Sheet and drag it onto the canvas.

- Drag the Write to Sheet node onto the canvas to add it to your workflow.

This node allows you to automatically send the JSON output from the LLM into a Google Sheet of your choice.
Step 6: Configure Google Sheets integration
- After dragging the Write to Sheet node on the canvas, click it to open settings.
- Under Connect GSheets, click New Connection and select your Google account.

- Set the data source to your OpenAI LLM node.

- Choose the Google Sheet you want to write to.

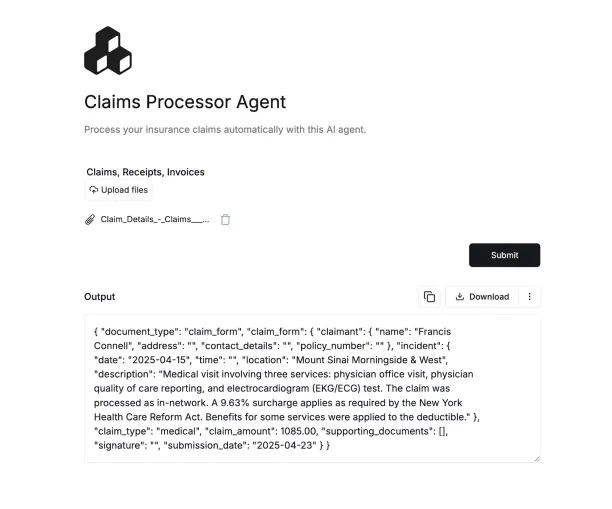
Step 7: Add output nodes
- In the sidebar, select output.
- Drag an Output node onto the canvas and connect it to the Google Sheets node.
- Drag another Output node and connect it to the OpenAI node.


This ensures users can view the structured JSON output directly in the UI.
Step 8: Export and launch your agent
- Click on the Export tab in the toolbar.
- Enter a name and description for your Claims Processor AI Agent.


You can now upload a claim, receipt, or invoice and receive structured JSON data.

Implementation challenges of claims automation agents
Rolling out an accounting AI agent involves intricate coordination between data infrastructure, systems integration, and domain expertise.
Integration complexities:
First, consider the nature of financial data. It’s highly sensitive and heavily regulated. This data is often distributed across various platforms like ERPs, accounting tools, and databases. Your AI agent must integrate seamlessly with these existing systems, which is no small feat.
Data cleanliness & readiness:
AI agents rely on accurate and consistent data to work effectively. If financial data is incomplete, outdated, or poorly structured, the AI may produce incorrect results. Successful accounting implementations will depend on solid data cleansing and normalization routines.
Regulatory compliance:
Your AI system needs enterprise-grade security measures. This includes using encryption, access controls, and audit logs to secure financial data. These systems also need to comply with regulations like GDPR, CCPA, and SOX.


Comments
Your email address will not be published. All fields are required.